A Tutorial for Creating a RDLC (Report Definition Language Client-side) report in Visual Studio 2005/2008
Visual Studio 2005 and 2008 comes with Report Viewer controls that allows your report to be viewed in ASP.Net Web Pages or Windows Forms. These reports have the RDLC (Report Definition Language Client-side) extension. This tutorial will show you how to use the SmartCodeDeveloper barcode control in RDLC.
Requirements
To use this tutorial, the following requirements must to be satified:
- Visual Studio .NET 2005/2008 is installed.
- Access database (sample.mdb bundled with SmartCodeDeveloper) or SQL Server 2005 / 2008 sample database AdventureWorks (or AdventureWorks2008 for SQL Server 2008)
- Reporting Services with Business Intelligence Studio is installed.
Steps
1) Install SmartCodeDeveloper on your computer.
2) Configure SmartCodeDeveloper to work with Microsoft SQL Server 2005/2008 Reporting Services. This can be done by launching the configuration tool from Start > All Programs > SmartCodeDeveloper > Configuration for SQL Reporting Services.
4) Run Visual Studio 2008 and create a new Report Server project by going to
File > New > Project. In the New Project dialog,
select Visual Basic (or Visual C#) in the Project Types box
and Reports Application in the Templates box. Leave everything as default and click OK.

5) The ReportWizard will be launched to help you create the report. Click Next to continue.
6) In Choose a Data Source Type, select "Database" as where you will be getting the data from and click Next to continue.
8) In Choose Your Data Connection, click on New Connection to create a new database connection. Alternatively you can select the AdventureWorks or AdventureWorks2008 database. In this tutorial we will use the sample Access Database that is bundled with SmartCodeDeveloper. You will see the following dialog.
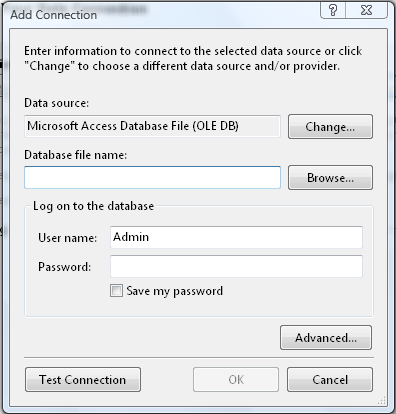
Click on Browse and navigate to "[SmartCodeDeveloper Directory]\Access Database" and select the sample.mdb file. Clear the User name and Password.
Click on Test Connection. Make sure you see "Test Connection Successded". Click on OK followed by Next.
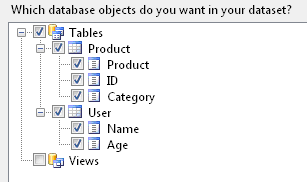
12) In Select the Data Source, select "Product" and click Next to continue. After that, click Finish to complete the Wizard. The RDLC project is now created. 13) Right click on the ReportsApplication in the Solution Explorer and select Add Reference. Select the Browse tab.
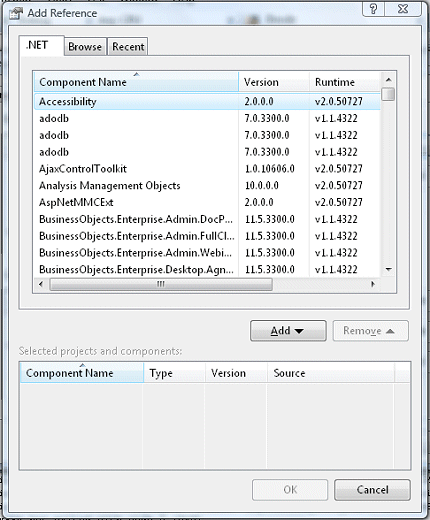
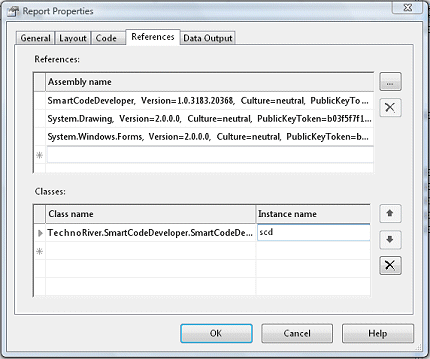
Select the SmartCodeDeveloper assembly from [SmartCodeDeveloper Directory]\SmartCodeDeveloper.dll and click on OK. 14) Click on Report1.rdlc in the Solution Explorer. In the menu click on Report>Report Properties. Click on the Reference tab. Add the System.Drawing, System.Windows.Forms and SmartCodeDeveloper assemblies by clicking on the "..." button.
System.Drawing and System.Windows.Forms can be added in the .Net tab while SmartCodeDeveloper can be added from the Browse tab. Make sure you have assemblies as shown in the following diagram.

In the Class name, key in "TechnoRiver.SmartCodeDeveloper.SmartCodeDeveloperControl" and in the Instance name, key in "scd". 15) Next, click on Code tab and paste in the following programming codes.
Public Function GetImage(Code As String) as Byte()
'Specify the symbology
scd.Symbology = TechnoRiver.SmartCodeDeveloper.SmartCodeDeveloperControl.BarcodeSymbology.Code128
'Choose font
scd.Font = New System.Drawing.Font("Arial", 24, System.Drawing.FontStyle.Bold)
'Choose Background Color
'scd.BackColor = System.Drawing.Color.Aqua
'Set and verify the data is valid
scd.BarcodeData = Code
scd.AutoSizing = TechnoRiver.SmartCodeDeveloper.SmartCodeDeveloperControl.BarcodeAutoSizing.No
scd.DisplayText = TechnoRiver.SmartCodeDeveloper.SmartCodeDeveloperControl.BarcodeDisplayText.No
'create a large image
'units in twips
scd.NarrowBarWidth = 100
'space on each side in twips
scd.BoundaryZoneX = 720
'scd.BoundaryZoneY = 64
'Set the width and height of the image
'in pixels
scd.Height = 240
'scd.Width = 200
Return scd.GetImagePNG()
End Function
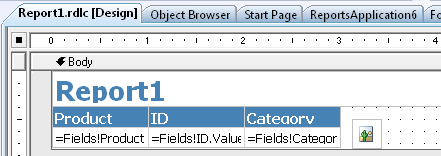
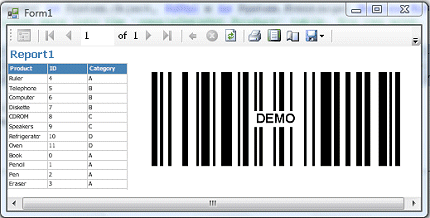
17) Click on the Image control. In the Properties dialog, key in "image/png" as the MIMEType. Select "Database" as the Source and set Sizing to AutoSize. Key in "=Code.GetImage(Fields!Product.Value)" as value. 18)Right click on Form1 in the Solution Explorer and select View Code. In the subroutine key in the following immediately after the "TODO" comments.
For C#
this.reportViewer1.LocalReport.AddTrustedCodeModuleInCurrentAppDomain("System.Drawing, Version=2.0.0.0, Culture=neutral, PublicKeyToken=b03f5f7f11d50a3a");
this.reportViewer1.LocalReport.AddTrustedCodeModuleInCurrentAppDomain("System.Windows.Forms, Version=2.0.0.0, Culture=neutral, PublicKeyToken=b77a5c561934e089");
this.reportViewer1.LocalReport.AddTrustedCodeModuleInCurrentAppDomain("SmartCodeDeveloper, Version=1.0.2986.26049, Culture=neutral, PublicKeyToken=null");
For VB
Me.ReportViewer1.LocalReport.AddTrustedCodeModuleInCurrentAppDomain("System.Drawing, Version=2.0.0.0, Culture=neutral, PublicKeyToken=b03f5f7f11d50a3a") Me.ReportViewer1.LocalReport.AddTrustedCodeModuleInCurrentAppDomain("System.Windows.Forms, Version=2.0.0.0, Culture=neutral, PublicKeyToken=b77a5c561934e089") Me.ReportViewer1.LocalReport.AddTrustedCodeModuleInCurrentAppDomain("SmartCodeDeveloper, Version=1.0.2986.26049, Culture=neutral, PublicKeyToken=null")
If you have deliberately used the Strong Name DLL in the previous steps, you can use the following codes. To use the Strong Name DLL it is important to remember to install the DLL to the GAC (Global Assembly Cache). Please note that you are only required to install the assembly into GAC if you are using the Strong Name DLL. Otherwise it is typically not required.
this.reportViewer1.LocalReport.AddTrustedCodeModuleInCurrentAppDomain("System.Drawing, Version=2.0.0.0, Culture=neutral, PublicKeyToken=b03f5f7f11d50a3a"); this.reportViewer1.LocalReport.AddTrustedCodeModuleInCurrentAppDomain("System.Windows.Forms, Version=2.0.0.0, Culture=neutral, PublicKeyToken=b77a5c561934e089"); this.reportViewer1.LocalReport.AddTrustedCodeModuleInCurrentAppDomain("SmartCodeDeveloper, Version=1.0.3183.20368, Culture=neutral, PublicKeyToken=726de6c9285da211");
Troubleshooting
If you get the error message below when compiling the project
Could not load file or assembly ‘SmartCodeDeveloper, Version = 1.0.XXXX.XXXXX, Culture=neutral, PublicKeyToken=null’ or one of its dependencies
you may want to make sure System.Drawing and System.Windows.Forms assemblies are already included.
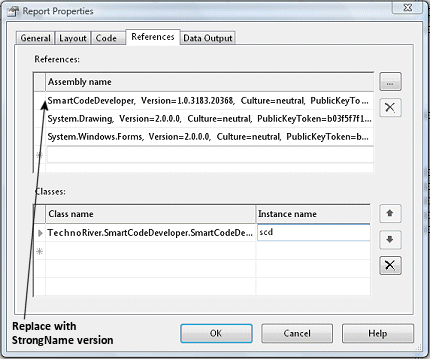
If the error persists, you may want to use the strong name version of the SmartCodeDeveloper.dll for developing your reporting service application
To do so,
1) Locate the strong name version at
C:\Program Files (x86)\TechnoRiver\SmartCodeDeveloper4.X\StrongName\ SmartCodeDeveloper.dll
2) Go to DOS prompt (running as administrator), navigate to the StrongName directory listed above, and install the strong name version of SmartCodeDeveloper into the GAC (Global Assembly Cache) by typing the following
[Directory]>Gacutil /i SmartCodeDeveloper.dll
3) For your report, go to Report > Properties, select to the Reference Tab, delete the existing reference of SmartCodeDeveloper.dll, and add a new a new reference to the StrongName version at C:\Program Files (x86)\TechnoRiver\SmartCodeDeveloper4.X\StrongName
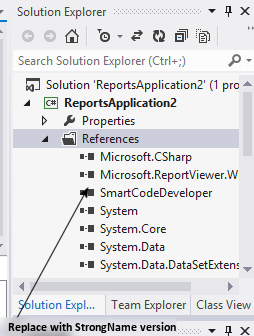
4) For your project, under the References folder, remove the existing reference to SmartCodeDeveloper.dll and add the StrongName version.
Back to SmartCodeDeveloper Main Page
Download SmartCodeDeveloper Here!