Using SmartCodeDeveloper in a XBAP Rich Internet Application
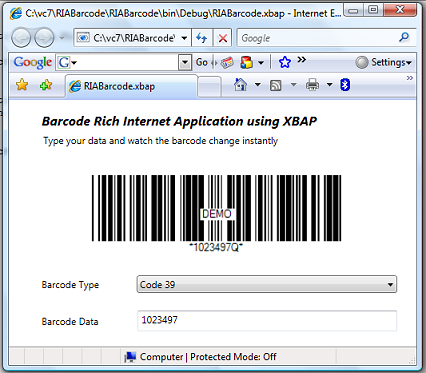
This tutorial demonstrates the creation of a Rich Internet Barcode Application using the SmartCodeDeveloper XBAP control. The Rich Internet Application (RIA) supports immediate and robust interaction between the user and the application on a web page. In our example, the barcode changes immediately whenever its data or symbology is altered.
Pre-requisites
Visual Studio 2005If you are using Visual Studio 2005, the .Net Framework 3 SDK and its Visual Studio 2005 extension has to be already installed on your machine.
SDK for Windows Vista and .NET Framework 3.0
Visual Studio 2005 extensions for .NET Framework 3.0
Visual Studio 2008
For Visual Studio 2008 you do not need to install the .Net 3.0 Framework or Runtime.
Demo
To view the actual XBAP application in action, please visit Rich Internet Barcode Application
Steps
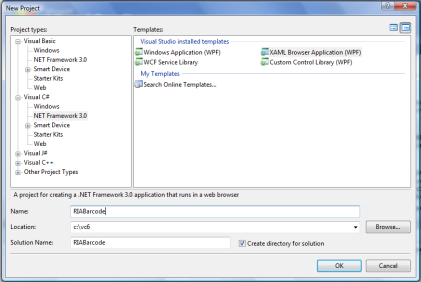
1) To get started, go to File::New Project in Visual Studio 2005, and select XAML Browser Application (WPF). Name the project RIABarcode.
2) We will now add an Image control to our form to host the barcode. Open the Page1.xaml file using the XAML Editor. Make changes to this file so that the Grid Panel Width is now 540 and Height is 325.
<Grid Height="325" Width="540">
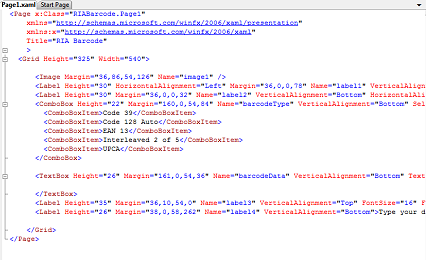
Paste the following block of code within the <Grid> </Grid> into Page1.xaml. This will create an Image control to host the barcode, a Combobox to select the barcode type, and a TextBox for data entry.
<Label Height="30" HorizontalAlignment="Left" Margin="36,0,0,78" Name="label1" VerticalAlignment="Bottom" Width="94">Barcode Type</Label>
<Label Height="30" Margin="36,0,0,32" Name="label2" VerticalAlignment="Bottom" HorizontalAlignment="Left" Width="94">Barcode Data</Label>
<ComboBox Height="22" Margin="160,0,54,84" Name="barcodeType" VerticalAlignment="Bottom" SelectionChanged="barcodeType_SelectionChanged">
<ComboBoxItem>Code 39</ComboBoxItem>
<ComboBoxItem>Code 128 Auto</ComboBoxItem>
<ComboBoxItem>EAN 13</ComboBoxItem>
<ComboBoxItem>Interleaved 2 of 5</ComboBoxItem>
<ComboBoxItem>UPCA</ComboBoxItem>
</ComboBox>
<TextBox Height="26" Margin="161,0,54,36" Name="barcodeData" VerticalAlignment="Bottom" TextChanged="textBox1_TextChanged" MaxLength="18" TextDecorations="None">
</TextBox>
<Label Height="35" Margin="36,10,54,0" Name="label3" VerticalAlignment="Top" FontSize="16" FontStyle="Italic" FontWeight="Bold">Barcode Rich Internet Application using XBAP</Label>
<Label Height="26" Margin="38,0,58,262" Name="label4" VerticalAlignment="Bottom">Type your data and watch the barcode change instantly</Label>
The screen after pasting should show something like the picture below.
3) Next, we will add code to the Page1.xaml.cs file so that a barcode will be drawn when the window loads. Copy the block of code below to the Window1.xaml.cs file.
We handle the two events textBox1_TextChanged and barcodeType_SelectionChanged so that the barcode will automatically update itself whenever the user changes the data or barcode symbology.
The DrawBarcode method uses the SmartCodeDeveloper XBAP control to create a BMP image in an array of bytes. The array of bytes is then passed through a BmpBitmapDecoder and converted to a BitmapSource, which is used to set the Source property of the Image control (image1).
{
InitializeComponent();
barcodeData.Text = "1023497";
barcodeType.SelectedIndex = 0;
DrawBarcode();
}
void DrawBarcode()
{
TechnoRiver.SmartCodeDeveloper.SmartCodeDeveloperControl scd = new TechnoRiver.SmartCodeDeveloper.SmartCodeDeveloperControl();
scd.BarcodeData = barcodeData.Text;
int sym = barcodeType.SelectedIndex;
if (sym == 0)
{
scd.Symbology = TechnoRiver.SmartCodeDeveloper.SmartCodeDeveloperControl.BarcodeSymbology.CODE39;
scd.ExtendedStyle = TechnoRiver.SmartCodeDeveloper.SmartCodeDeveloperControl.BarcodeExtendedStyle.No;
}
else if (sym == 1)
{
scd.Symbology = TechnoRiver.SmartCodeDeveloper.SmartCodeDeveloperControl.BarcodeSymbology.CODE128;
scd.ExtendedStyle = TechnoRiver.SmartCodeDeveloper.SmartCodeDeveloperControl.BarcodeExtendedStyle.No;
}
else if (sym == 2)
{
scd.Symbology = TechnoRiver.SmartCodeDeveloper.SmartCodeDeveloperControl.BarcodeSymbology.EAN13;
scd.ExtendedStyle = TechnoRiver.SmartCodeDeveloper.SmartCodeDeveloperControl.BarcodeExtendedStyle.No;
}
else if (sym == 3)
{
scd.Symbology = TechnoRiver.SmartCodeDeveloper.SmartCodeDeveloperControl.BarcodeSymbology.I2OF5;
scd.ExtendedStyle = TechnoRiver.SmartCodeDeveloper.SmartCodeDeveloperControl.BarcodeExtendedStyle.No;
}
else if (sym == 4)
{
scd.Symbology = TechnoRiver.SmartCodeDeveloper.SmartCodeDeveloperControl.BarcodeSymbology.UPCA;
scd.ExtendedStyle = TechnoRiver.SmartCodeDeveloper.SmartCodeDeveloperControl.BarcodeExtendedStyle.Yes;
}
else
{
scd.Symbology = TechnoRiver.SmartCodeDeveloper.SmartCodeDeveloperControl.BarcodeSymbology.CODE128;
scd.ExtendedStyle = TechnoRiver.SmartCodeDeveloper.SmartCodeDeveloperControl.BarcodeExtendedStyle.No;
}
scd.DisplayText = TechnoRiver.SmartCodeDeveloper.SmartCodeDeveloperControl.BarcodeDisplayText.Yes;
byte[] imgbyte = scd.GetImageBMP();
System.IO.MemoryStream ms = new System.IO.MemoryStream(imgbyte);
BmpBitmapDecoder decoder = new BmpBitmapDecoder(ms, BitmapCreateOptions.PreservePixelFormat, BitmapCacheOption.Default);
BitmapSource bs = decoder.Frames[0];
image1.Source = bs;
}
private void textBox1_TextChanged(object sender, TextChangedEventArgs e)
{
DrawBarcode();
}
private void barcodeType_SelectionChanged(object sender, SelectionChangedEventArgs e)
{
DrawBarcode();
}
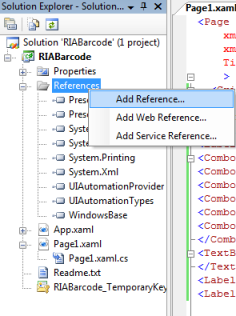
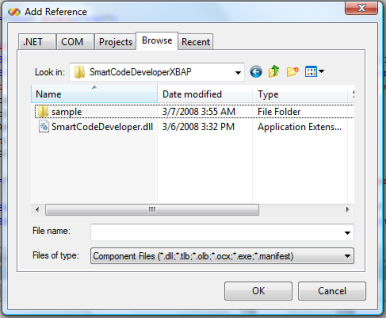
3) Add a reference to SmartCodeDeveloper. Right click on the RIABarcode project and select Add Reference.
4) Click the Browse Tab and navigate to SmartCodeDeveloper XBAP control. Note that this control is also named SmartCodeDeveloper.dll, but it is located in the SmartCodeDeveloperXBAP folder. The default location for the DLL is at C:\Program Files \TechnoRiver \SmartCodeDeveloper \SmartCodeDeveloperXBAP\SmartCodeDeveloper.dll
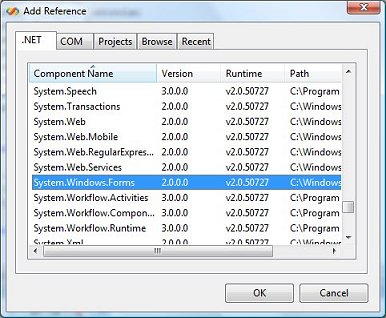
5) Add a reference to System.Windows.Forms.
6) We are now ready to run the Barcode RIA (Rich Internet Application) application in Internet Explorer.
